Saturday, February 25, 2017

That Bugs Me... :/

There are always projects to do on a boat... especially when you live aboard. Once a project is complete, you always hope you don't have to revisit it and most times, if you did it right, you will not, (at least not for a while). But every now and then (more often if your personality leans toward imperfect perfectionism), a past project bugs you... something about it makes you want to go back to it and FIX IT!

So it has been with my Dorade Boxes... 

Way back in February of 2015, I installed my Dorade Boxes. For those of you who do not know what Dorade Boxes are, they are wooden boxes (most often made of Teak), designed to let air inside your boat while NOT allowing water to enter in, (see diagram below).

Anyway, being new to refitting a sailboat, I didn't know that most people (not all), cut the Dorade Boxes to sit level with the waterline and that usually requires an angled cut. So, in my naivete, I just bolted them down to the deck using hanger bolts. 

February of 2015... Dorade Boxes installed (the wrong way)

Later, when I realized they were not installed correctly... IT BUGGED ME! Two years later... the bug is dead!


I still have to varnish the boxes and polish the vents, but at least now, they are right. (Please forgive my messy deck but I have a few deck projects running simultaneously).

Fair seas and God bless!

The pictures below were added on 2/27/17...


Thursday, February 23, 2017

Which Way is South?

When I first bought Annie, her compass had cracked and all the oil/water (whatever they put in those things), had drained out... it was pretty much useless.

Finding and installing a new compass has been on the Punch List for a long time (item # 101). Well, I finally found a good deal on Amazon, ordered it, and installed it today. Now I know which way is South! That's a good thing since that is the way I'm eventually heading, (slight grin as I amuse myself with my wit and charm).

I also tackled another job that's been laying there for the longest time, item #102 - sanding my belaying pins & rack. I have one belaying pin that broke off a long time ago, so I'll have to replace it.

I started sealing the scupper drain that runs through the boat and drains out the side of the boat about a foot above the waterline. Both sides have been a pain in my posterior ever since I bought Annie... leaking. So, I'm sealing the drain with epoxy and raising the catch basin slightly so no water stagnates in it. (BTW, those drains are also clogged more often than not). I'll post pictures of that project when it's complete.

So, short week for me but I'm getting some chores done.

Fair seas and God bless!


Friday, February 17, 2017

Cap Rails are Finished.

When I bought Annie her cap rails were a mess. I wasn't sure how I was going to attack this project but I knew it eventually had to be dealt with.

Wood Rot...

Cracked & Broken Spots...

Old Varnish...

Useless Seams and Sealant...


I thought about taking all the teak cap rails off and fiberglassing the hull to deck like John and Dianne Clark did on Konami, (click here to check out that job). But after some honest reflection I decided that would probably be a little over my novice head and with time constraints, it was ruled out via logic and honesty.

I also thought about spicing in teak but at $18-$22 per board foot, my budget immediately over-ruled that ridiculously expensive idea.

Then, I heard of a local guy who had a lumber mill and specialized in "Deadhead Cypress." Now, if you don't know what Deadhead Cypress is, here's a link explaining its origin and properties. Briefly, "Deadhead Cypress" are logs that were harvested for lumber back in the late 1800's and early 1900's but sank in the rivers before reaching the saw mills. Many of the logs have lay at the bottom of rivers and swamps for 100 plus years. They are therefore resistant to rot, (as well as many other valued attributes).

I decided I would purchase rough Deadhead Cypress boards and splice them into the damaged areas of my cap rails and then, paint the cap rails. The Deadhead Cypress was resistant to rot and relatively hard and any differences in grain or other cosmetic issues would be hidden from view by the cap rail paint.

I got the pieces I needed for $24 bucks. (After messing up those pieces, I went back and got three more pieces for $20 bucks)! The total project cost with wood, 3M Green Putty, epoxy, primer, paint, paint brushes, and replacement lumber for cutting mistakes... less than $100 bucks. Plus, it actually turned out very nice.

"A picture is worth a thousand words" so here's the pics...

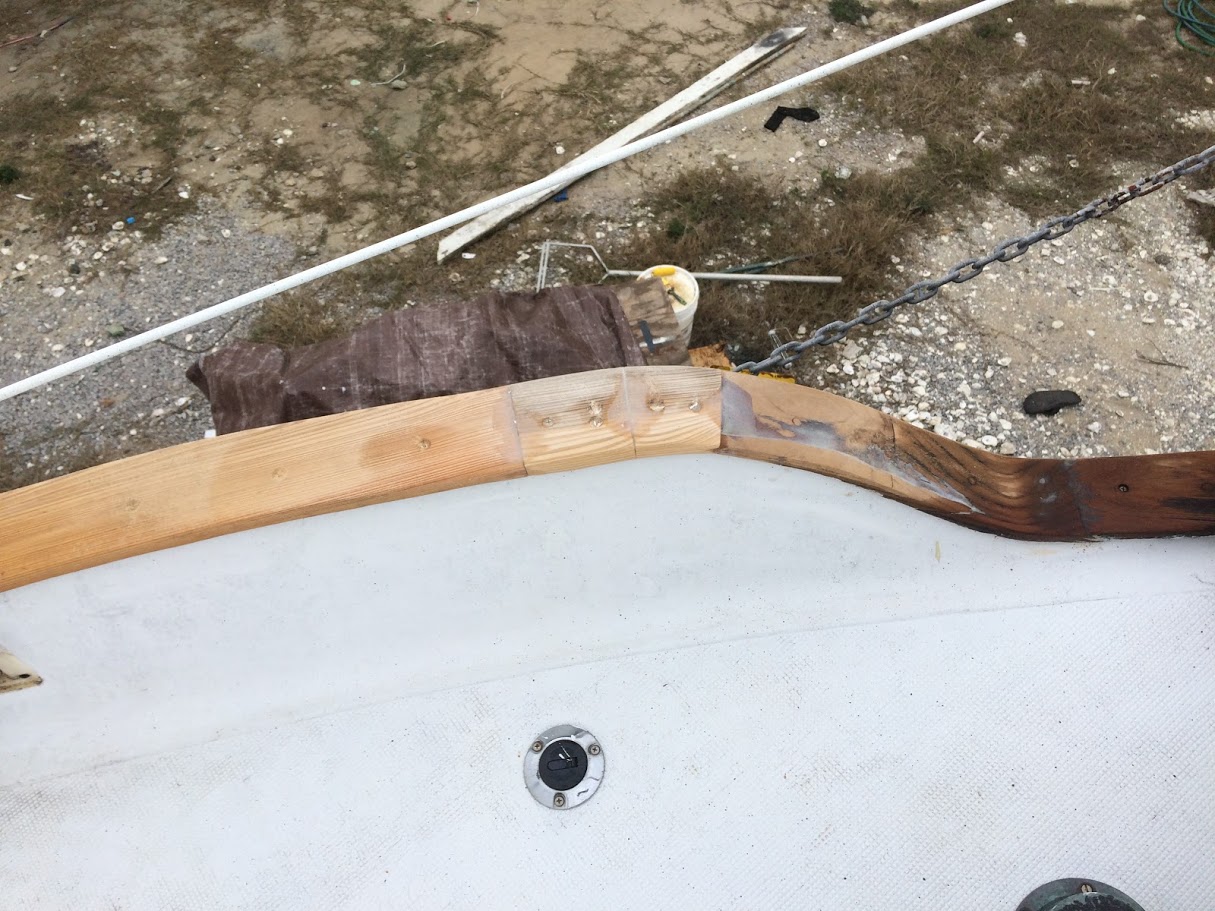
First, the splicing...

Had to do some small splices and then sand and shape the uphill curves.

I used countersunk SS screws and 4200 to attach the spliced pieces...
I also used epoxy... (they are not going anywhere!)


Lots of sanding and shaping...


Then, the epoxy...


Then, the 3M Green Putty...


Then, the taping...


Then, the priming...


Then, the painting...


 Fair seas and God bless!